I have decided to move my blog over to wordpress, so go check it out here.
This blog will remain here, but this will be my last post.
Sunday 30 December 2012
Sunday 2 December 2012
A Labour of Love Part 2 - Lifelines and Keeping Track
I meant to publish this blog post a looong time ago, but as often happens, life got in the way. So here is the second part of my post on what I learned whilst knitting the Princess Shawl.
I have previously blogged about using lifelines on the
Princess Shawl. I used a vertical lifeline
whilst knitting the edging, which really helped when I came to pick up stitches
for the border. I didn’t use a vertical
lifeline when knitting the border however, as these stitches are picked up
individually as you knit the final edging and using the technique given in
Heirloom Knitting, I found this easy to do.
In a project this extensive, it is imperative to keep track
of where you are. I used post-it notes
to mark my position on charts and to keep track of row numbers. One really simple tip I read on PrincessDiaries, is to put a post-it note above
the row you are working on instead of below.
When I first read this, I didn’t see what difference this would
make. However, once I gave it a go, I
realised that this enables you to not only see the row you are on, but those
that have come before, thus allowing you to ensure your current stitches line
up with those below. In this way, I
could always spot mistakes straight away as my stitches would not line up. I did not use horizontal lifelines when knitting the Princess. In fact, I never have when lace knitting. Being an impatient knitter, I could never be bothered to put one in! There were a couple of times where I did have to rip back, but never more than a row. If I dropped stitches or made an error, I would sort out the problem in that area rather than ripping everything back. I have become quite good at knitting surgery! I also used markers between each repeat on
the feathered border so that I never had far to rip back. I didn’t use markers on the centre as the row
repeats were so small.
Towards the end of the project, I was knitting at least 2 – 3 hours a
day exclusively on this (as well working full time of course!). I had such
an important and immovable deadline and as the date of my wedding loomed I was
genuinely worried that I would not finish the shawl. At this point, I did not particularly enjoy knitting on it
and just wanted it to end! My hands
ached and my husband thought I was crazy for knitting so much. In fact, during our wedding ceremony, he even vowed to always be there to rub my hands for me after too much knitting! However, although I found it stressful having to knit this to a deadline, I do wonder that if I hadn't been making it for such an important occasion, whether I would have even finished it by now!
Looking back six months hence, I am still amazed every time I look at it and I feel so proud of what I accomplished. However, I am really enjoying knitting whatever I choose to and the instant gratification of working on small projects. I feel though that the experience has given me a huge amount of confidence in what I can achieve in knitting and that I have learned nearly all there is to know about lace knitting. So I am ready to move on to new challenges and techniques. From my current spate of projects, I think 2013 will be the year I master colourwork and stranded knitting. Watch this space!
Monday 7 May 2012
A Labour of Love Part 1 - Tools

There were times when I didn’t think I was going to make it,
but here I am with a beautiful finished shawl.
And I love it! My Princess took
me 1 year and 16 days to knit, but a further 2 weeks passed before I had
grafted, blocked and woven in the ends, just 2 days before the wedding. I plan
to do a series of blog posts now that I have finished, reflecting on some of
the things I learned during this time and what I would take into consideration
if I was ever to make another shawl like this.

Very early on, I realised that I was going to need
specialist needles for this project. I
knit the edging border on 2mm metal straights, but I found these very slippery with the cashsilk. I persevered, but once I reached the feathered
border, I needed a circular. I bought a
cheap 2mm circular on ebay but I found that the stitches were catching in the join
between the needle and the plastic. It
was so bad that I had to lift each stitch over the join and with 800 plus stitches on the needles, this was not practical.

After some research, I found Fleegle and purchased one of her specially adapted bamboo circular needles. The joins have been reset and coated with superglue and the points sharpened. They also have holes in for those who wish to easily thread lifelines through their knitting and the bamboo made them 'grab' the yarn. These needles were so much better to use and lasted me the whole of the border until I snapped one whilst travelling. I bought a second one and managed to snap this too after only a few weeks! (Again, it was my fault – these are very delicate needles.) At this stage, it was too late to order another one as they come from the US, so I made do with the metal circular to knit the final edging as I did not need to move the stitches over the join.
In summary, make sure you have the right tools for the job before you start and take care of them! They make the
project much easier and quick-moving, but remember that needles at this gauge
are fragile (though superglue does wonders!) Part Two will follow in the next few days and will be on lifelines and keeping track.
Tuesday 26 July 2011
Knit Nation 2011 Part 2
Whilst at Knit Nation, as well as shopping, I took a class in colourwork with Susanna Hansson. This was the first knitting class I have taken, being a largely self-taught knitter, so I was unsure what to expect. Would it be one long lecture? Would it be too easy? Would it be too hard?
I needn't have worried - I loved it! The pace was just right for me with plenty of time to practise, and I now feel much more confident at using different colourwork techniques. The class was small and friendly with easy to follow handouts. Susanna was very clear with her demonstrations and helpful when we were doing individual practice.
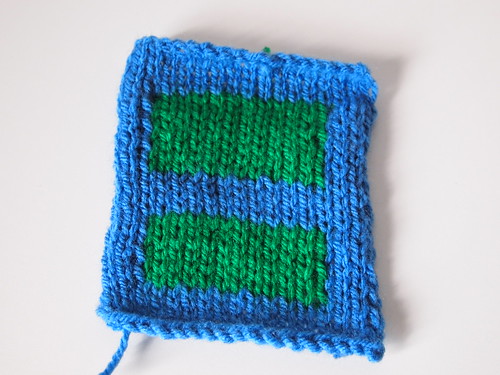
We began with intarsia by making two swatches. The first is an intarsia rectangle block which was to get us used to working with the two colours. Here is mine:
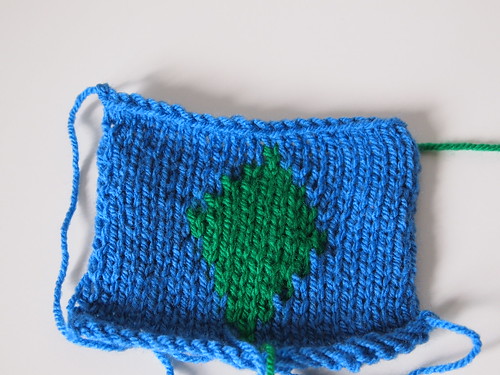
The second swatch was meant to be an argyle design but I only finished one diamond:
I was really pleased with how these both came out. I have tried intarsia previously, but my stitches always looked sloppy at the joins between the two colours. I have now learned that this was to do with how you wrap the yarns around each other (or when to wrap and when not to), particularly when the design is slanted like the diamond above.
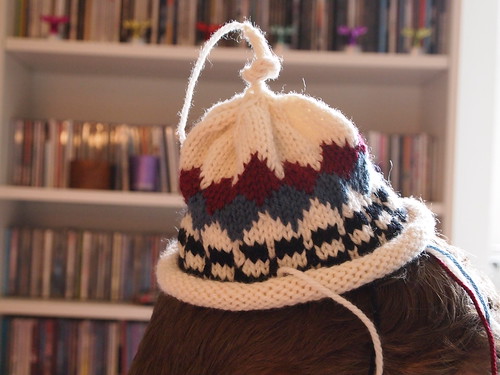
Next up was the stranded knitting section. Again, I have tried this technique before. I made Eunny Jang's Endpaper Mitts and these came out really well. However, when I tried Ysolda Teague's Cotton Reel Mittens a couple of years later, the tension was really off and even after blocking, they were wrinkly. I could not work out how I had gone so wrong. It turns out that I need to keep my tension really loose and resist that temptation to pull my floats tight. For our swatch this time, I chose to make a baby hat (as opposed to a tube/beer cozy). I finished it on the Sunday morning after Knit Nation. If you look closely you can see that the tension evens out towards the top as I realised I just needed to loosen up! I am really pleased though that this looks so neat and it hasn't even been blocked.
Please excuse all the undarned ends. And the head. My darling bf decided he wanted to try it on.
As well as learning the importance of tension in stranded knitting, we also learned about colour dominance, which I had never heard of before. The colour which dominates is connected with which yarn is floated under or over at the back and hence which hand it is held in (if you knit with both hands as I do). For most knitters, the colour in the left hand is floated under and will be dominant, whereas the colour in the right hand is floated over and will be...non-dominant (or submissive?). This occurs because the stitches in the over colour are slightly larger and so appear dominant over the other. Very interesting.
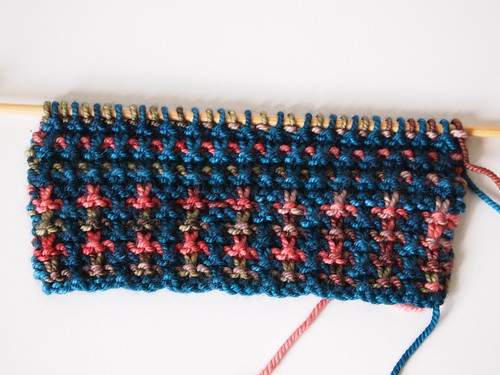
The last part of the class looked at slip stitch knitting, which I had never tried before. Susanna also brought some lovely yarn for us to try. It is an American hand-dyed yarn from a company called Prism. We experimented with using a semi-solid with a contrasting variegated yarn. Slip stitch knitting produces a nice thick textured fabric; I could really see using this for a warm pair of mittens (since I don't really do socks). Here is my swatch:
There are two different stitch patterns here; I was too lazy to bind off the first one! Slip stitch knitting works by knitting with just one colour at a time, slipping the stitches of the other colour. It is perhaps an easier technique than the first two, but the constant slipping means it is more difficult to get into a good rhythm.
So all in all, a very successful class for me. I can't wait to try some colourwork projects now!
Monday 18 July 2011
Knit Nation 2011 Part 1
I spent this past Saturday at Knit Nation at Imperial College, London and I had an amazing time. I was a bit nervous beforehand as I was going alone. My mum was meant to come with me, but due to an op to remove a cataract the day before, she couldn't be there (it all went fine though, and now she has amazing eyesight!). But I needn't have worried. Knitters are truly such kind and friendly people that I didn't feel lonely at any point during my day. Most of my time was taken up with the Knitting with Color class I took by Susanna Hansson. It was fantastic and I will talk more about that in my second blog post. What I wanted to share today were my purchases at Knit Nation. There were so many beautiful yarns and accessories to see!
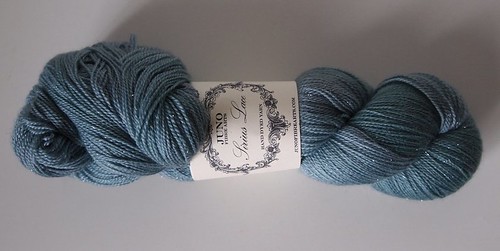
My first purchase was some laceweight by Juno Fibre Arts . Earlier in my day, I had seen a lady wearing a beautiful lace shawl made from a pink yarn with a lovely shimmery thread running through it. I decided I wanted something similar and then came across this - perfect. The yarn is called Sirius Lace and is in the colourway Envy.
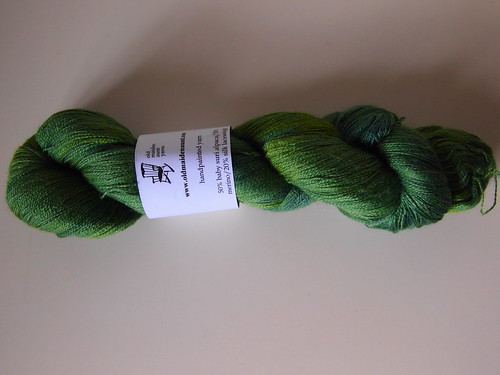
My second purchase was some more laceweight (because you can never have too much!) from Old Maiden Aunt. This is a lovely soft hand dyed yarn - alpaca, merino, silk mix. I also adore the colour as I'm having a bit of a green thing at the moment. The colourway is called Bitter Bug.
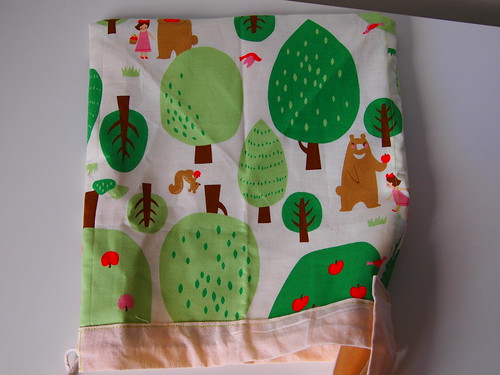
Next, I visited the stall shared by Made by Loumms and Sweet Clement. I follow the Loumms blog and I am friendly with erqsome on Ravelry, so I had coveted one of their beautiful handmade project bags for a while. I chose a wrister bag, an ingenious project bag which allows you to knit on the go. I really loved all their whimsical and fun fabrics, but this one was my favourite.
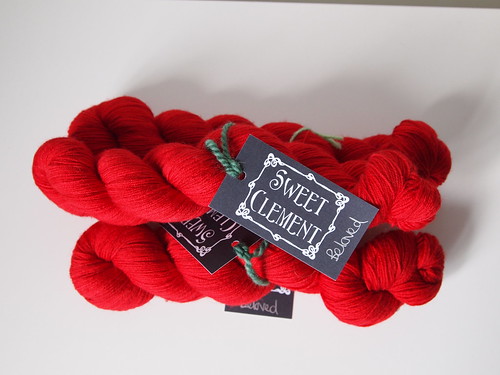
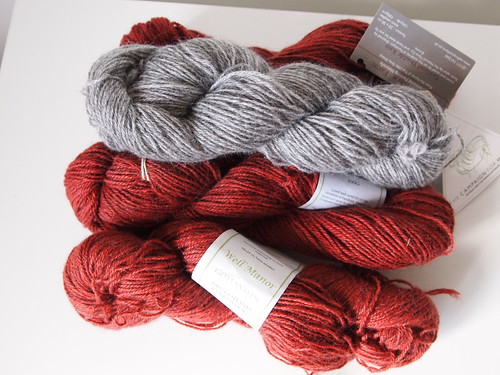
I had not heard of Sweet Clement before, but I loved the vibrant colours and so chose some lovely red 4 ply Superwash Blue Faced Leicester. It is called Beloved and is in the colourway Scarlet.
Last, but by no means least, there was a lovely stall from a place called Well Manor Farm. This company was new to me, but they were very friendly telling me all about their farm and the sheep. They raise and shear the sheep themselves, then dye the yarn. I chose some yarn from their Gotland sheep, which I hadn't heard of before, but they had some lovely samples which showed that it knits up beautifully. I bought the Gotland Lambswool in a DK weight, but they had yarn in everything from a 2 ply laceweight up to an Aran weight. All the colours were either undyed or dyed using natural dyes, resulting in a stall full of wonderful earthy colours. I have one undyed skein and three in a rusty red colour.
And that's about it. Needless to say, I shall not be buying any more yarn for a while. Now I need to just get knitting it all!
PS. I'm still plodding along on the Princess Shawl. I'm on to the second chart of the large border. Progress is slow, but I'm not giving up!
Tuesday 26 April 2011
Progress of a sort
I finally finished the border edging of the shawl. It got quite repetitive towards the end, but I did speed up considerably to the point where I could do one repeat in under half an hour (without TV). The holidays helped too, and with a few days of marathon knitting, I finally got it done. I decided to do 72 repeats and this seems plenty long enough. Stretched out, it nearly fits across our living room!
Before embarking on the picking up I hunted around for some advice and found some helpful posts on The Princess Diaries. One thing I was unsure of was whether you were meant to pick up and knit (which is what I usually do whatever the wording) or just pick up the stitches. After reading a clarification from Sharon Miller on The Princess Diaries, I picked up (ie. just putting the loop on the needle) without knitting. I picked up 12 sts per repeat and 13 sts in the middle repeat to give me the required 865 sts. To help, I placed safety pins on the border strip marking every repeat and then marked each group of 12 sts picked up with a loop of thread. I then also marked each group of 10 repeats with another marker. This helped me to keep track, and I managed to pick up the 865 sts first time with no mistakes. It did take me about 4 hours however, and no distractions were allowed!
One technique I'd like to share which really helped with the picking up was using a vertical lifeline whilst knitting the border. I found this technique on Fleegle's blog. Essentially, as you work the border, you carry a contrasting thread along the straight edge. Then when you come to pick up stitches, the loops are already there on the thread for you to pick up. This makes it so much easier since stitches knit in gossamer are super-tiny and very difficult to see.
So, current progress? I worked the plain knit rows and am now on Row 4 of the feather border. Each row takes me about 45mins, so I'm aiming for about 2 rows a day. It's slow-going but it's exciting to start this new stage.
Tuesday 15 March 2011
Bewitched By A Princess
Wow, has it really been so long? Getting back into blogging was one of my New Year’s resolutions and now we are beginning to emerge from the doldrums of winter, I feel inspired to begin again. I don’t have any particular reason for the long hiatus – life just sometimes gets in the way.
My recent inspiration to blog again has come mainly from my current wip. Just over a year ago, I got engaged and of course the first thing I thought about (after saying yes and jumping with joy, of course) was wedding shawls! I have deeply coveted the beautiful Shetland lace shawls, especially the ethereal wedding ring shawls, for years and had even thought of casting one on previously, but had decided that that would be just a little too weird. So once the ring was on my finger and I had come down to earth, I started looking at Heirloom Knitting. I had originally wanted to do the wedding ring shawl, but I was unsure if I would be able to persevere with this, and instead decided to pick the Spring Shawl. A triangular shawl knit with cobweb weight yarn, it didn’t seem as daunting. So I ordered the necessary supplies and got started. Fast forward nearly a year and it was finished. And I liked it. But I didn’t love it. Because in the mean time, I had fallen in love with the Princess Shawl.
So over the last month I have been deliberating about whether or not to be crazy and knit a second wedding shawl. I have time (the wedding is not until April next year) but these shawls are so all-consuming that I don’t have time to knit much else. And this would mean knitting with gossamer yarn on teeny tiny needles – what if I just got bored?
Alas, common sense did not prevail and a few days ago, after months of research, I chose my materials and cast on. I spent a long time looking at different yarn choices. I knew I wanted a silk blend and decided to go with the Heirloom Knitting Gossamer CashSilk in a pale silvery grey (I think the colour is correctly called platinum). I’d read that it can be slippery, which it is, but I have not found it unmanageable. I shall probably take that back the first time I drop a stitch. I’m knitting it on 2mm needles and I’m happy with how the lace is looking at this tension.
My reason for wanting to start blogging this project is that in my research, I found that not many people have started this shawl, let alone finished it. Therefore, I hope that my documentation of this project may be of use to someone else who’s thinking of knitting this. My initial response would be: go for it! I was quite daunted by everything I read, and for a long time (and perhaps the reason I chose not to knit such a fine-gauge shawl to begin with) is that I felt that it would be beyond me. So far, the pattern is very clear and not really any more difficult than the Spring shawl. The knitting is slower going as the stitches are smaller and the yarn more slippery, and therefore more difficult to manoeuvre safely. But I’m enjoying it, and surely that’s what matters the most. Here's how much I've done so far.
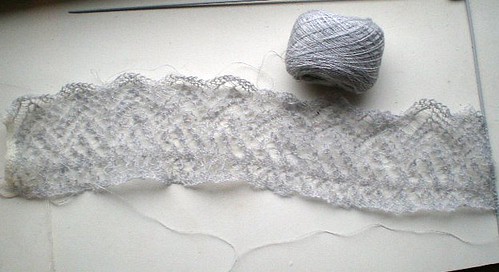
The pattern begins with the border; I’ve knitted about 8 repeats 10 repeats out of 60-80 something so far (I haven’t decided exactly how many to do yet). I’m aiming for about 2-3 repeats a day which will hopefully help with giving me time to work on other projects. I’m not going to promise to blog every day or every week, but I shall try to give periodic updates on the knitting.
Monday 15 June 2009
It's been awhile...
Wow! Can't believe it's been so long since I last posted on here. It's been such a busy 8 months and I can't believe it's nearly all over! I'm going to be a teacher at last. And although it's been hard work, I have enjoyed this year and I feel so much more certain that this is what I want to do. So...feeling happy right now and if it would just stop raining and be sunny for a while, life would be perfect.
On the knitting front, I have managed to squeeze some in and I do have some FOs to show. However, recently, a new hobby has overtaken knitting - sewing. I've already made two dresses and it is so addictive. I think it's the whole instant gratification thing, whereas knitting is more of a slow burner. I guess perhaps I'll have to have a little photoshoot of all the things I've made recently. I'm feeling so much more creative right now too. It's hard to get your brain in that kind of mode when you're at school. Yay, for long holidays!
Anyway, this was just a quick post. Pics will follow in the next one.
Tuesday 14 October 2008
Alexandra Palace and Urban Cross-Stitch
Since I didn't make it to iKnit Day, I decided I definitely had to go to the Knitting and Stitching Show at Alexandra Palace. I've been for the past two years with my mum, but she was away on holiday this time, so I decided to go with an old friend. However, in the end she couldn't make it, so I ended up going alone. And you know what? I had a really good time. It's silly, but if I hadn't thought my friend was coming I would never have gone alone, but once I got there, I really enjoyed myself.
I was pretty restrained on the yarn front. Having been before, you get to know which stands will be there and so less overwhelmed by it all. I bought some gorgeous alpaca/silk/cashmere laceweight yarn and some black alpaca blend to make a cowl for the bf (yes, another one). I was most excited that there was a Habu stand. I've heard so much about their yarns but never seen/felt them in person. And all I can say is wow! I wanted to buy all of it just to see all the different types of fabric I could create. I eventually decided on a dark blue/purple shade of their wool/stainless steel mix and some buttery yellow silk. I can't wait to knit up the wool/steel mix. I'm going to do either a scarf or a cowl. Something sculptural.
My last purchase was of the non-yarn variety. I bought a little urban cross-stitch kit. I haven't done cross-stitch since I was little, but I always enjoyed it. I just didn't want to crochet pictures of flowers and puppies and things. But this one is a little mini-kit of a pacman with a ghost and cherry. And the ghost glows in the dark! I just love it. I bought it from this company. They also do lots of kits of Banksy prints. My little one only took me a few hours so I'm thinking of getting a bigger one to do. I really enjoyed it! Even the bf thinks it's cool and that doesn't happen very often with my crafting.
Saturday 20 September 2008
I take back everything I've ever said...
I'm currently writing my first essay in 8 years and it's hard! Being a scientist/mathematician I've always liked to express the opinion that of course science and maths is far more difficult and requires much more work than humanities. (This was probably also fuelled at university by all those humanities students who only had about 2 lectures a week.) But I have to take it all back now. I'm struggling with this first essay for my course and it's only 700 words! I'm interested in the topic and can easily talk about and debate it, but putting words on paper...it's so hard! I shall have to wait for the bf to get home (he's an english literature masters graduate) so he can help me.
Needless to say, not much knitting has been going on lately.
Needless to say, not much knitting has been going on lately.
Subscribe to:
Posts (Atom)